
Solving the Borderless Printing Error: Resetting Platen Counter or Borderless Printing of Printer
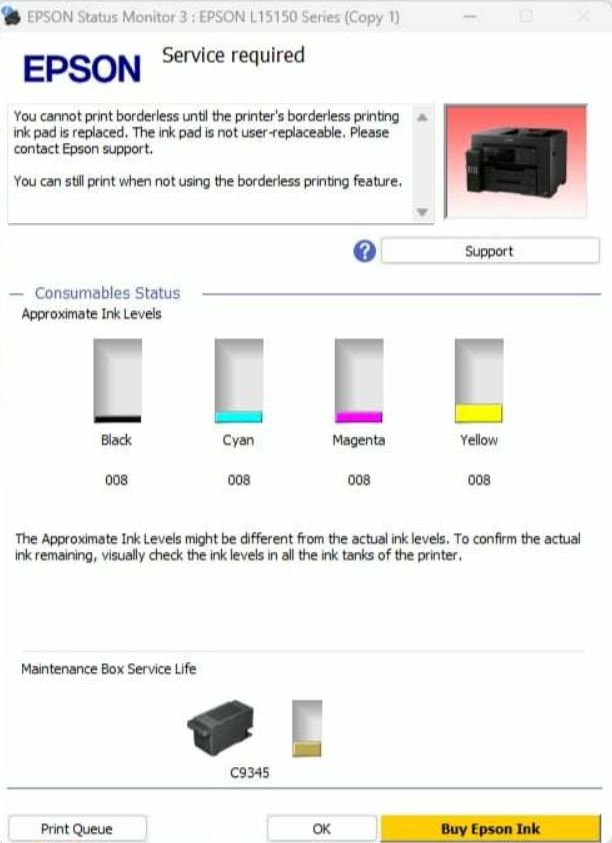
In the world of printing, the ability to print borderless documents is a sought-after feature, allowing for stunning visuals and professional-looking output. However, imagine encountering the frustrating message: “You cannot print borderless until the printer’s borderless printing ink pad is replaced. The ink pad is not user replaceable.” It’s a common issue faced by many printer users, but fear not – there are solutions available to overcome this challenge.
Understanding the Issue
Before delving into the solution, let’s first understand why this message appears. In many inkjet printers, there is an ink pad or sponge that absorbs excess ink during the printing process. Over time, these ink pads can become saturated with ink, leading to the need for replacement. When the printer detects that the ink pad is full, it may display a message indicating that borderless printing is unavailable until the ink pad is replaced.
Here are some of the printers that the Borderless or Platen Pad Counter can be reset by the reset program but NOT the Maintenance Box Counter
L11160, L15150, L15160, L15180, L16650, ET-15000, ET-16150, ET-16500, ET-16600, ET-16650, ET-16680,
ST-C2100, ST-3000, ST-C8000, ST-C8090, PX-M6711FT, PX-M6712FT, EW-M5610FT


The Solution: Replacing the Ink Pad
While the message may seem daunting, replacing the ink pad is a straightforward process that can be done with a few simple steps. Here’s how to do it:
Step 1: Identify the Ink Pad Location
The ink pad is typically located in the printer’s maintenance area, accessible by opening the printer cover or accessing a panel on the printer’s exterior. Consult your printer’s manual or manufacturer’s website for specific instructions on locating the ink pad for your printer model.
Step 2: Remove the Old Ink Pad
Once you’ve located the ink pad, carefully remove it from the printer. Depending on the printer model, the ink pad may be secured in place with clips or adhesive. Use caution when removing the ink pad to avoid damaging other printer components.
Step 3: Install the Replacement Ink Pad
After removing the old ink pad, install the replacement ink pad according to the manufacturer’s instructions. Ensure that the replacement ink pad is compatible with your printer model and securely fastened in place.
Step 4: Reset the Printer
Once the replacement ink pad is installed, reset the printer to clear the error message and allow for borderless printing. Consult your printer’s manual or manufacturer’s website for instructions on how to reset your specific printer model.
Buy the Reset Key for the Borderless or Platen Pad Counter Resetter here:
ONE-TIME KEY -10 USD
UNLIMITED KEY -15 USD
Preventative Measures
To avoid encountering this issue in the future, consider implementing preventative maintenance measures for your printer. Regularly clean and inspect the printer’s maintenance area to prevent ink buildup and prolong the life of the ink pad. Additionally, follow the manufacturer’s recommended maintenance schedule for replacing ink pads to ensure optimal printer performance.
Conclusion
While encountering the message “You cannot print borderless until the printer’s borderless printing ink pad is replaced. The ink pad is not replaceable.” can be frustrating, it’s a manageable issue with a clear solution. By following the steps outlined above and implementing preventative maintenance measures, you can ensure that your printer continues to deliver high-quality, borderless prints for years to come. Don’t let a full ink pad limit your printing capabilities – take action and keep your printer running smoothly.